Healthy Sheet Pan Potato Nachos with Ground Beef
Sheet Pan Potato Nachos are a delicious weeknight dinner recipe that the whole family will love! Unlike regular nachos, this recipe uses crispy potatoes instead of chips for a healthier alternative. Potato nachos are packed with flavor and great for anyone who is gluten-free, grain-free, or dairy-free!
Equipment
- 1 Sheet Pan
- Parchment Paper
- Frying Pan
Ingredients
- 4-5 Large Yellow Potatoes, Cut into thin discs.
- 2 Bell Peppers, Diced
- ⅓ Cup Black Beans
- 1 Avocado
- ½ Cup Grape Tomatoes, Cut in half.
- Fresh Cilantro, Chopped
Ground Beef
- 1 Pound Ground Beef
- 2 Teaspoons Chili Powder
- 1 Teaspoon Salt
- 1 Teaspoon Cumin
- 1 Teaspoon Garlic Powder
- ½ Teaspoon Paprika
Instructions
- Rinse and dry potatoes then slice potatoes into thin discs with a sharp knife. Place a single layer of potato discs on 2 parchment paper lined baking sheets and coat with nonstick cooking spray. I use Primal Kitchen Avocado Oil Spray!
- Bake at 400 degrees for about 20 minutes on each side. (Or until golden brown.)
- Next, add ground beef into a frying pan or cast iron skillet. Cook on medium-high heat while breaking apart. When the meat is halfway cooked through, add chili powder, salt, cumin, garlic powder, and paprika. Continue stirring until meat is fully cooked.
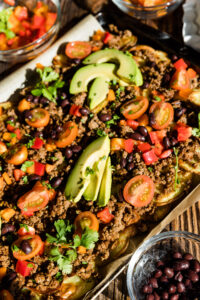
- To assemble nachos, start by layering crispy potato discs on a sheet pan.
- Then add cooked ground beef, sliced or cubed avocado, grape tomatoes, bell peppers, and black beans. Garnish with freshly chopped cilantro and serve hot!
Notes
Potato Tips
- Do not overlap the potatoes when baking them. By keeping a little space between them it will allow them to get crispy which is essential for a successful recipe.
- If you cut the potatoes too thin, they will fall apart easily when you add toppings. I prefer hand cutting them, but you can also use a mandolin.
- To check if the potato slices are too thin, make sure the raw potato does not bend when you pick it up.
- Note that cooking time will vary depending on how thick you cut the potatoes.
- It's best to use large sheet pans for this recipe so you can fit all of the potato slices.
- Line the baking sheet with parchment paper to avoid the potatoes from sticking.
How To Store Leftovers
This dish is best enjoyed fresh. Any leftovers should be store in an airtight container in the refrigerator for 3-4 days. Reheat on a baking sheet in the oven or the air fryer. You can also microwave leftovers, but the potatoes tend to get soggy. ** See full post for step by step photos and more helpful information.Nutrition
Serving: 1ServingCalories: 436kcalCarbohydrates: 43gProtein: 23gFat: 20gSaturated Fat: 6gPolyunsaturated Fat: 1gMonounsaturated Fat: 10gTrans Fat: 1gCholesterol: 62mgSodium: 556mgPotassium: 1423mgFiber: 9gSugar: 5gVitamin A: 2018IUVitamin C: 102mgCalcium: 59mgIron: 4mg
Did you make this recipe?Tag @freshwaterpeaches on Instagram!